Onesie... twosie... threesie...


Monthly onsies... a project I've had in mind since before my dear Mags arrived. I thought they'd be a cute way to track her growth during her first year. Alas, I didn't complete them until month two of her sweet life, which means onesie one is out of the picture. But, better late than never, I suppose.

Here's the plan: I'll sit her in her cute rocker wearing the onesie that coincides with her current month of age and snap a picture. Lambie will join her to help illustrate her growth. 

How the onesies came together:

Step 1: Purchase onesies for months 1 (or two, in my case) through 12, wash them, and iron them.

Step 2: Select fabric for your numbers and iron fusible webbing (stiffener) to the back of each piece. This is a two-sided iron-on material that will allow you to die-cut your numbers and iron them to the onesies. I used Ultrahold Heat-n-Bond by Therm O Web.  

Step 3: Use a die-cutting machine to cut your numbers. I used the Fabrique by Making Memories. Note: If you don't have a die-cutting machine, you can use stencils to trace numbers and cut them out, or you can simply freehand cut them out. It's up to you!


I cut four of each number so I can make extra sets to give as gifts. 

Step 4: Iron the numbers on the onesies. 

Step 5: Take your photos onesie... errr, once a month. ;) 


Since I was a slacker and missed month one, I'm starting with month 2. (How can my baby girl be two months old already?)

You'd think the photo taking would be the easy part. Yeah, not so much. Here are just a few of the MANY outtakes. 
When ever there's a camera out, Jack has to make an appearance.

Reese (dog speak for "cheese")

Going...

Going... 

Gone! 
Whew! This picture-taking business is hard work.


Cheers!

BTW, I'm thinking about selling these onesie sets. If you're interested in purchasing a set, please e-mail me at M2E2G at aol.com. I'm happy to use colors that work for your needs, and I can do sets for boys, girls, or I can keep 'em gender neutral. Just let me know. :)

The Name Game: Nursery Decor

Foolish me. I thought maternity would leave me with all this free time to create. Umm... not so much. I've pretty much spent every free minute of this happy time holding my sweet girl. BUT, I have managed to squeeze in a few crafts, including decor for Miss Maggie's room.

As soon as I saw these frames and letters from BasicGrey, I knew I had to have them for Mag's nursery. I filled them with fabric—the same fabric I used on the banners I made for her special space.

If you like this look, you can create it in a few simple steps:


1. Select your frames, letters and fabric. Iron the fabric.
2. I used spray adhesive to attach the letter negatives to the fabric.
3. Smooth out any air bubbles. (BTW, is it me or does my hand look VERY freaky in this photo? It bugs. Like Penguin's flipper or something. Yuck!)
4. I backed my fabric with white cardstock to make the fabric pop more than it would if I had just framed it without a backing.
5. Frame the fabric-backed letter.

You'll have to excuse the reflection. Shooting glass with a cell phone doesn't make for the best shot. 
These letters are actually two projects in one, as you can use the negative shape (above), as well as the positive shape (the letter you punch out), which is what I did for the M.


Here's a closer look at each letter. I adore the splash of color this adds to Maggie's room. And she seems to dig it... well, as much as a two-month-old can dig wall art. :)


More baby crafts to come soon. Until then, I hope this one brings a smile to your face. Thanks for stopping by.

Cheers!

Eight Things at 38 Weeks


From the looks of my ever growing belly, my baby girl’s arrival is just around the corner. The end of this miraculous stage is fast approaching. Of course, the thing I look forward to the most is meeting this little person who has been keeping me company for the better part of the year. What a moment that will be!
There are a few other things that I’m looking forward to. Nothing that compares to meeting my babe, but things. In honor of the 38 week milestone, here are just eight of those things:
1. Wearing shoes other than flip flops. Right now, my swollen feet won’t fit into anything else. Good thing warm weather is here.

2. Drinking a Red Bull. Oh, how I miss my wings. 

3. Bending over to pick things up without moaning and groaning. 

4. Walking without a waddle. 

5. Sleeping through the night without having my bladder wake me several times. Of course, that will likely be replaced with a babe waking me, but that’s A-okay with me. 

6. Drinking the occasional cocktail with dinner. Mmmm...

7. Wearing something other than the six-ish outfits I currently have available to me. 

8. Fully embracing Cory again. Bring on the bear hugs! 

Cheers!

Plus Size Model (and her cute hubby)


A few weeks ago, the talented Elisha Snow posted on Facebook about a beautiful, blossom-filled cherry orchard by her house, saying she would do photo shoots there if anyone was interested. I had been thinking a bit about a maternity shoot and I love Elisha's work, so I jumped at the chance. I'm happy to say that my sweet husband played along without the slightest grumble. How'd I ever get so lucky?

Here are just a few of the lovely shots Elisha took, both in her studio and out with the blooming cherry trees. For more on her work, be sure to check out her website.


Thanks so much, Elisha! You do beautiful work and these are photos we'll treasure forever! 

Cheers!

Win a Spot in Maggie Holmes Design's Photo Workshops!

Today I'm excited to announce the launch of some must-experience online photo fun--Maggie Holmes' Photography Workshops. Maggie has an amazing eye for photography with seven years of professional experience. I have the pleasure of working with her on many photo projects for Creating Keepsakes magazine, and I can assure you her style is striking, fresh and full of life. 

Now's your chance to learn from Maggie and use her tricks of the trade to master your own photography style! Here's a peek at just some of her impressive work:


Aren't these pics perfect? I adore how she combines light and color to capture true personality. You can see more of Maggie's work here

This is your opportunity to learn from Maggie and watch your own photo skills...ahem, develop! 

These two online classes have just opened for registration, and, for the first time ever, Maggie is offering an early bird discount if you sign up before the month's end. Giddy up! 

Win a Seat in Class
Naturally, this blog hop party wouldn't be complete without a chance to win a spot in class. Leave a comment on this post on or before this Wed., May 23, and Maggie may randomly choose you to join in the photo fun for free. Yes, free! She's selecting one of her winners from the comments entered at every stop along the blog hop way, so make sure you take a minute to up your odds by also entering at your next two stops, which are:


Double the pleasure--Maggie will randomly select a second lucky winner from comments received on her blog, so you'll definitely want to enter there. 

A Little Fine Print: If you purchase a class and then are drawn as a winner for that class, your registration fee will be refunded. Does not apply to purchases made for previous classes.

Good luck to you, my blog friend! Whether you win a spot or simply sign up for your seat, I'm sure you'll love this experience. Now, hop on!

Cheers!


Vintage Ribbon and Fabric Storage, and a Fabric Giveaway!

One of my favorite columns to write at work is “Stash It.” Or, as we like to call it around the office, Must Stash It...get it? Mustache It? LOL Good times!


Anyway, this column appears in every Scrapbooking Tips & Tricks special issue, and it’s all about scrapbook organization. The current issue, Scrapbooking Tips & Tricks: Texture, was extra fun to write, because it’s about organizing your textured treats (ribbon, fabric, floss, etc.). These are some of my favorite scrapbooking supplies, both to use and to organize. 


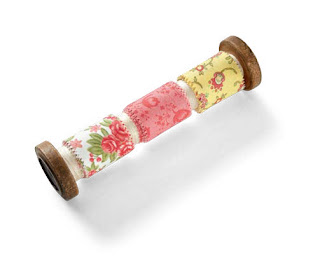
One of the ideas featured in my column was using vintage textile spools to organize your trims. I’ve picked these classic pieces up here and there at consignment and antique shops. They’re surprisingly easy to find. You can even search online at Esty.com and/or eBay.com and find several results. 
Take your trim stash from this...


To this!

Image used with prior consent from Creating Keepsakes magazine.

Simply wrap the trim around the spool and use a small straight pin to hold it in place. Once the spool is full, put it on display to enjoy. 
When it comes to how you approach your spool storage, you have options.
  1. Wrap a bunch of various trims on one spool 
  2. Wrap your spools by trim type, keeping like types together 
  3. Wrap and divide the spools by trim color 

You can also take your fabric scraps from this...
To this, using the same method!

Image used with prior consent from Creating Keepsakes magazine.
For more on organizing your textured stash, including a cool fabric-covered suitcase, I hope you’ll tune into Studio 5 this morning at 11:00 on channel 5 (if you’re in Utah). For those of you out of state, I’ll post a link to the segment soon.
Also, I have a complete step-by-step tutorial for creating the train case on the Creating Keepsakes blog today. Check it out and, while you’re there, enter to win some stunning new Anna Griffin fabric! “Yum” is the best word I can find to describe the awesome assortment we’re giving away. 


I’ll leave you with a question. How do you organize and contain your fabric? I’m getting more and more into this beautiful crafting supply, and I’m always looking for storage solutions. Any ideas you have to share would be much appreciated. :)
Cheers!

A Hairy Situation, a Momentous Celebration!


With changing seasons, you may find yourself thinking about a new ‘do. If you’ve always had long locks, why not consider chopping them for charity? It’s a great way to try a new style and help an amazing cause.


As you may know, I started growing out my hair for charity shortly after I learned of my mom’s breast cancer diagnosis (Fall ‘08). I’m thrilled to report that Mom finished her treatments in March of this year, which meant it was time to make THE cut!


And I wasn’t alone in my hair-growing endeavors. My dear friends Wendy Smedley and Angie Lucas were with me every step of the way, growing out their hair to support me and the loved ones in their lives who were also dealing with the heartache that comes from having breast cancer. Here we are just before our cuts.


And here are a few of the after shots. I cut a total of 10”.


Thanks to Becky Olsen for joining us on cut day. She took these photos and also donated her own hair!


My first thought was, “Eeep! It’s SO short,” but the shock eventually wore off (my hair has never been this short), and I’m actually really digging the new look. It’s much, MUCH easier to do now, and I’ve basically cut my drying time in half. If that’s not enough to convince you to do the same, I don’t know what is...oh, yes I do--it’s the fact that you can make someone else’s day by sending your hair to be made into a beautiful new wig!


Not only is donating hair completely worthwhile, it’s also oddly comforting. How so? Well, if you’ve ever watched someone you love going through cancer treatments, you know that it can leave you feeling incredibly helpless. I found that this was something I could do--something I could focus on as Mom was going through so much. I talk a little bit more about this in this awesome segment Studio 5 did on our hair-growing efforts. I hope you have a minute to watch. I think you’ll be glad you did. Hair’s to you! ;)


Japanese Masking Tape Projects (and a little TV Time)


Domo arigato, Japan. Japanese masking tape is one of my favorite things to hit the crafting market in a long time. I love how versatile it is. Thanks to its not-so-tacky tack, I can put it on my wall without damaging the paint, and I can even peel and stick it on paper several times without messing up the paper. It’s a masking marvel. Check out a few things I created with it, using the Love My Tapes brand, for a local TV segment.

Build a Banner
I wrapped the tape around a ribbon and adhered it to itself to create this banner. It’s a quick way to dress up the home or the yard.


For a more seasonal take, I punched bits of cardstock and added letter stickers to spell “spring.” I then attached the letters using the pretty tape.


Create with Clothespins
The tape will adhere to several surfaces, including wood, so I used it to dress up an ordinary clothespin. It’s a unique way of adding a placecard to a table setting.


Tape Up Some Letterhead
I cut the tape into triangles and added a little stitching to create a banner across the paper. I will either add my name to the banner to create personalized stationery, or I will turn this into a scrapbook layout. Either way, this is a simple way to make a playful banner.


Wrap without Paper
You don’t need wrapping paper to dress up a present. Instead, wrap a basic box with Japanese masking tape. It’s colorful and quick…what a gift!

Enhance an Envelope
Make your letter standout from the crowd with a little tape.

And don’t forget the back. Slap a little tape on the flap.

What About You?
I know I’ll be doing more with this fun-to-use craft medium. Have you had a chance to play with it yet? What’s your favorite use?

TV Time
If you're interested, you can check out my Studio 5 segment, where I shared these and other projects. You'll love seeing what Darin, one of the hosts, did with the tape. It was very creative. Enjoy the show!

Also, you can check out several of my past Studio 5 appearances by visiting the section of the "Apperances" Creating Keepsakes website. Thanks for taking a peek. Your support is always appreciated. :)

Ten steps towards serenity now...Or at least soon.

Ah, the winter blues. I’ve heard of them, but this is the first year I’ve actually experienced them…or at least I think that’s what this is. I’ve been a bit down since the holidays, which would explain my lack of blog posts (poo), but I’m determined to beat these doldrums.

Here are ten things that have helped me shake the sads. I hope you’ll find something that speaks to you, too.

1. Love & Be Loved
Just as one of my favorite movies, Moulin Rouge, says, “The greatest thing you’ll ever learn is just to love and be loved in return.” I’m blessed with a beautiful husband who loves me, but sometimes I lose site of that fact and shrug off his affection with excuses—“he’s just saying that,” or “he’s humoring me because he feels he has to.” This needs to stop. I love him and am lucky to have him loving me in return. Cherish and appreciate the words and acts of affection offered by others, rather than second guessing at every turn, and prepare to welcome the warm feelings that come with that acceptance.

2. Add a Little Color
This morning I woke up before my alarm and decided to paint my nails a vibrant, sparkly shade of orange. It’s amazing what colorful toes can do for the soul.


3. Turn Off the News
Just five minutes of the news can get me down faster than a hearty laugh. (That’s a lame narcolepsy joke, because I fall forward when I laugh. Hardy har.) If you find yourself becoming bogged down by the doom and gloom in today’s top stories, simply change the channel or hit the power button. I’ve been doing this and find it’s a wonderful way to recharge the feel goods.

4. Take Joy in the Success of Others
My big bro won $200 on a $2 lottery ticket this week. My mom only has two cancer treatments left. Two of my friends have just purchased their first homes. These are all things to take joy in. It doesn’t have to be a victory directly related to you to make you happy. So, instead of saying, “I’m happy for you,” say, “I’m happy with you.”

5. Connect with Friends
My sweet friend called me out of the blue the other night, just to tell me how much she enjoys my Studio 5 TV segments. She didn’t follow that by asking a favor or fishing for a compliment in return. She simply wanted me to know how she felt. I’m going to take her lead and do the same—tell my friends how I feel about them. Making others feel good is a great way to boost your own spirits.

6. Play with the Pups
I tend to take my silly doggies for granted, when I should be celebrating the joy they bring me. The other day they were both crowded under my craft desk, even though it was a super tight squeeze, just so they could be close to me. I had to sit back and laugh at this gesture. Feeling sad? Give your pet a little TLC. I promise it will be returned tenfold.

7. Tackle a Task
Clean up, clean up, everybody do your share. If you can believe it, we just took our Christmas decorations down this week. Now, to be fair, we didn’t put them up until Dec. 23, but this was still far too long to leave them up. And even though it was a lot of work to take them down, it was totally worth it. Is there a project that’s been hanging over your head? Greet it head on, and you’re sure to find some relief.

8. Get Out
It’s far too easy to just stay in and do nothing when you’re feeling down, as I’ve learned the hard way. Well, no more. I went to the mall over the weekend. It was just a quick trip, but I left SO inspired. Take time to recharge with a little retail therapy. Even if you don’t spend any money, you’ll come home having purchased some mental uplifting.

9. Create
Don’t create because you have to (doing an assignment doesn’t count). Instead, create because you want to. I recently made a fun Valentine’s Day craft (more on that in a future post) for my cute coworkers and found so much delight in putting it together. Do something, anything, creative, and watch the serenity find you.


10. Be Okay with the Sad
Sometimes it’s hard to be at peace with the sadness, but doing so is a form of self acceptance. I read (and enjoy) the beautiful blog posts of others, with their seemingly perfect lives, their perfect photos, and their perfect ideas, and I inevitably compare—not good! I’m not them, and that’s okay. My life is far from perfect, but I’m doing my best to get by. If that means taking time to cry it out, I’m going to cry it out. If that means a messy house, then bring on the dust bunnies. All we can do is be ourselves and find contentment in doing so. Do that, and be one step closer to inner peace.


I’m still dealing with sadness, but this list has me a few steps closer to shaking those feelings. And for that, I’ll celebrate this small victory. How do you conquer the winter blues? I’m all for reading any advice you have to share.