Cupcake-Liner Crafts: Part 2


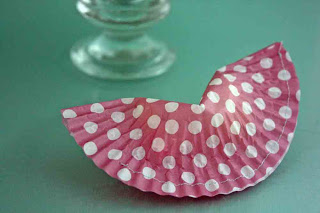
Of all the cupcake-liner fun I had, this project is probably my favorite. It’s cupcake liner fortune cookies! They’d be great for baby showers, parties, weddings, or as a surprise in someone special’s lunch.
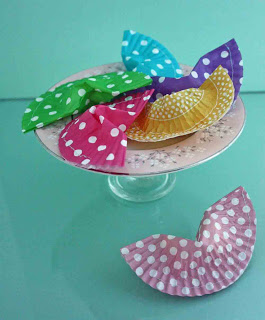


Fortune Cookies

They’re super easy to make!

  1. Fold a regular cupcake liner in half.
  2. Stitch (I used a sewing machine) around the outer edge of the liner.
  3. Leave about 1/4” unstitched at the end. This is your opening to insert candy. (I used after-dinner mints, as they’re small and dry.)
  4. With your finger, push the center up to create the fortune cookie shape.
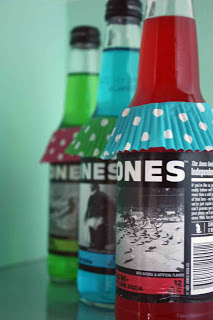

Bottle Skirts

This is probably the easiest of my cupcake-liner projects. They’re bottle wraps. Simply remove the circle from the center of the liner and put the skirt around a bottle. Forget about marking your drinks at a party with a marker. This approach is cute and quick!
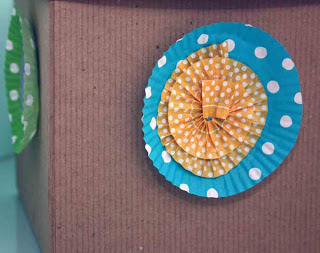

Quick Gift Wrap

Have a gift that needs wrapping? Use cupcake liners to dress up an ordinary gift box. Simply cut liners down so that the edges are short. Use the area you trimmed off to create a decorative center by twisting and gluing it into a spiral in the center.


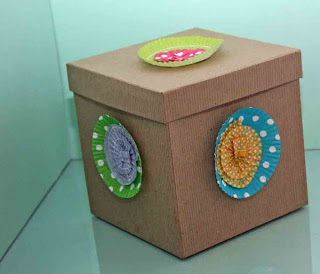
Note: Cupcake liners are slick (so the cake won’t stick to them), so you’ll want to use a strong glue. I used Fabri-Tac by Beacon’s. Hot glue would work as well.
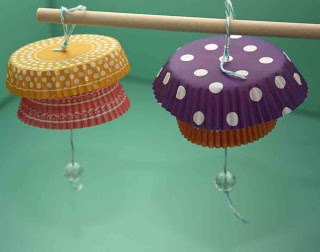
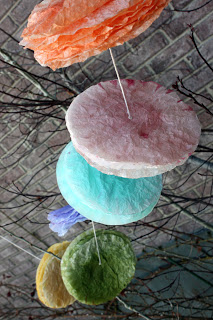


Liner Lanterns

These dangle-y delights are simply threaded cupcake liners. Used a needle and some baker’s twine to string them up. I started with a smaller liner and put a regular liner on top of it (with the edges cut down). You can string up one or add a bunch to a single string.


Cory calls these my mushrooms. I was going for lanterns, but, no matter what you choose to call them, they’ll make any room brighter! :)


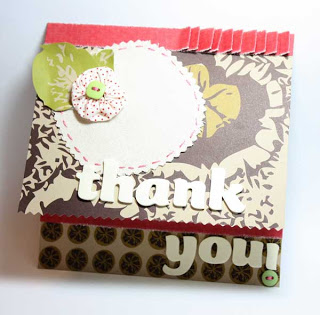
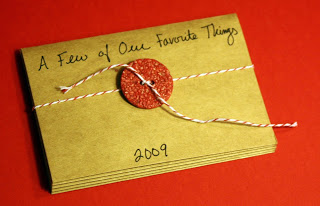
I have one more project to share, a card, which I’ll post on Friday. In the meantime, you can watch my recent TV segment on these crafts here. And you can check out my past segments on the Creating Keepsakes website. Thanks!


Fun with Coffee Filters (part 1)


Wanting to add some color to this dreary wing (aka winter-spring) we’ve been having here in Utah, I spent part of last Saturday playing with coffee filters. Yeah, that’s right, coffee filters. Well, filters and spray mist. The result: several different projects. I decided to post them here in case you’re looking for a little color this wing, too.

Coffee Filter Project #1: Banner
I made this for my family’s Easter celebration. I love the bright colors.


Creating this one is simple. Just spray circular coffee filters with spray mist (I used Glimmer Mist from Tattered Angels) and allow them to dry (takes about 10 minutes). With each color, keep one crisp and crumple up the second one. Then, layer the crumpled one over the straight one and attach letter stickers.


On the ends, I crumpled and stapled together a sprayed filter to create flowers.


Once your pieces are all put together, clip them on a string for a fun and easy banner!


Coffee Filter Project #2
I used a few of my extra colored filters to create a bright, spring garland. This time, I threaded the filters in color groupings on the string.


You don’t have to be a coffee drinker to do this craft on the cheap. I bought an entire stack of circular filters from the dollar store for, yes, you guessed it, a dollar. Excellent! Enjoy the filter fun and check back on tomorrow for another idea.


Do you have last-minute wrapping to do? You can still add a handmade touch to your presents. These tags are super easy to make and very inexpensive—just the right combination in these remaining hours before Santa makes his rounds.

I downloaded these awesome tags, designed by Rebecca Cooper, on Write.Click.Scrapbook.


I then printed several sheets of these beauties, punched them out and adhered them to scalloped pieces of cardstock (also punched).


These can do more than just make a gift look great; they can also make a gift all on their own. Simply slip them in a clear bag and add a bag topper made from scraps of paper and a few festive stickers.

Happy wrapping! Happy giving!

Gift Cards, the Finale (and more Studio 5 fun)!

Gift cards are the perfect last-minute gift. Is there a fashionista on your Naughty-or-Nice list? What about a photo enthusiast? Maybe someone who needs a little pampering? Or a bitty baby? Young or old, I have a few more gift card ideas that should do the trick.

Let’s begin with the youngest on your list. Slip a gift card in a baby sock and clip a hair bow on the sock for added decoration/a bonus gift (for the little girls, that is).


I created a similar project for Paper Crafts magazine a few years ago. This tag/hair bow combo was featured in their Gifts from the Heart special issue.


Along the same lines, you can give a gift card for a manicure in an inexpensive pair of gloves. This also works well for PF Changs gift cards. (You’ll see why when you watch my Studio 5 flick below.) ;)


This is a favorite of mine. Turn an office tag into a closet by tri-folding cardstock, wrapping it around a tag and attaching the “doors” together with magnetic snaps. To create the black around the doors, I simply cut a sticker from Glitz Girls Designs.

Give someone a pair of socks, a scarf or another inexpensive fashion accessory and attach this closet tag to the item with a card to a clothing store. On the inside, write something like, “Have fun completing the outfit!”


Say cheese! Here’s an idea for a photo-lovin’ friend. Give a gift card to a photo developing/gift site or store and attach it to a photo pick. For added festivity, put the pick in a little pail with a few treats to anchor it in place.


If you’re interested in seeing me present these on Studio 5, a local human-interest show, check out the video below. See if you can catch my word slip-up. I’ll give you a hint: it has to do with a water bottle clip and Santa's reindeer. Oh, the merry horror! ;)

Enjoy!


My 15 Minutes of Fame (okay, maybe it was closer to six min.)


I made my big TV debut this week. I’ve been on the boob tube a time or two, but this was my first time on “Studio 5,” a local human-interest program that airs here in Utah. I received a surprise greeting in my in-box from one of the show’s producers, asking me to do a segment based on one of the classes I taught for the University of Utah this fall. How could I resist?

Here I am on the Studio 5 set, just before going live. Eep!


My segment was on creative holiday update letters. You know what I’m talkin’ about when I say that update letters, also known as form letters, can be a bit ridiculous if not done correctly. Well, I shared a few ways to keep them less on the look-at-us-and-how-great-we-are side and more on the it’s-so-fun-to-reconnect-with-you-in-this-unique-way side. ;)

This is one of the projects I shared on the show, complete with instructions:


Step 1: Make a bitty flip book using small envelopes. To play on the “My Favorite Things” theme, I used brown paper packages…I mean, envelopes, brown paper envelopes!


Step 2: You’ll need one envelope for every member of your family you plan on including in your update, plus one for the cover. Add adhesive to the top, outside edge of all but one of the flaps.


Step 3: Stack the envelopes, tucking each flap inside the next and fold the flaps down to adhere them together.


Step 4: Add small photos (mine are 2" square) to the outsides of all of the envelopes, minus the cover. Don't forget the furry family members. Note: I also matted my photos on scalloped square pieces of patterned paper, which I punched.


Step 5: Give each of your family members a “Favorite Things” quiz and write the answers on small note cards that will fit your envelopes. This is a fun way to get to know the loved ones you spend everyday with, while also sharing your interests with your extended list of family and friends.


Step 6: Tuck each family member’s card inside the envelope with their photo on it.


Step 7: Tie up your brown paper package with string (or baker’s twine) and secure it in place by threading it through a button.


I’ll be sure to share some of my other show projects with you in the coming days on my blog. After all, now’s the time to get crackin’ on those festive greetings.

For now, I’ll leave you with a look at the show. Please don’t judge me too harshly. I’m use to being the publicist behind the talent, not the talent. Trust me, it’s a completely different view from this angle. If my video doesn't work, you can view it by clicking here. Enjoy!


Frank & Greens


Frankly, I enjoy Halloween projects, so I’ve created a little card. I got the idea after die-cutting a bunch of bitty envelope shapes. The negative shape left in the cardstock reminded me of a Frankenstein head.


Decorative packing tape can add a little something extra to your paper crafts. I put a strip of it across the bottom of my card. I like how the green comes peeking through the tape.


I wasn't sure why, but my button stickers weren't quite cutting it as the bolts. My cute Cor had the solution. He cut two small strips of black cardstock for the bolt ends. It was just what Frankie needed to look complete. Thanks, hon!


I used a couple of fun adhesive techniques to create the glitter stitching. For more on those, check out my post on the Creating Keepsakes blog. While you're there, I hope you'll enter to win the Glue Grab Bags we're giving away this week.

Winner Winner!
Speaking of giveaways, I never did announce the winner of my Stuff Week stamp set giveaway. SO sorry about that. Congratulations, Alicia! Random.org has selected you as my winner. Please e-mail me at M2E2G@aol.com with your name and mailing address and I'll see that the stamp set is sent your way. Thanks!

Stuff Week, Day 5: Hey, how about a card (& a giveaway)?


Okay, so technically it’s day six, but who’s counting? I hate to do this to you, but I’m going to share a recycled project—one that I’ve already featured on the Creating Keepsakes blog.

What’s the deal? Well, I used one of the happiest stamp sets around to make this card and My Cute Stamps has agreed to give a set away. So, this means a repeat (if you read the CK blog, that is).


This silly card was designed for my awesome card group. We were asked to make "humorous birthday cards," which is more difficult than it may sound. I hope this mades you chuckle.


The design was inspired by this video…


Which was inspired by old videos like this...


A Bit o' Blog Candy Happiness

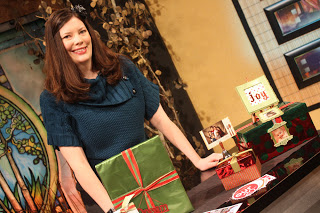
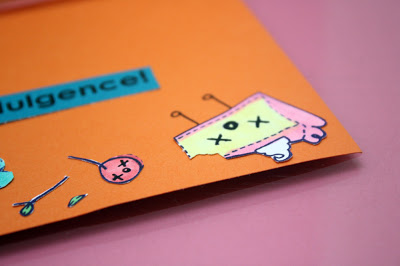
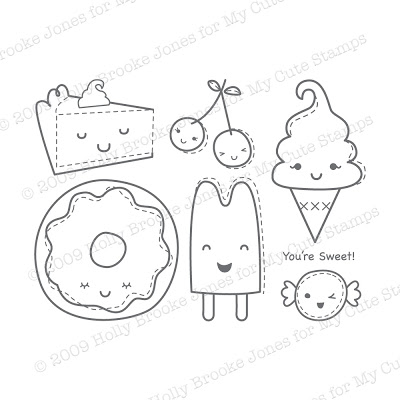
Do you want to be entered to win this way dang cute stamp set? In the spirit of laughing, let's share jokes. Simply leave me a comment with your favorite joke between now and next Friday, Sept. 25, and I’ll randomly select my lucky (and funny) winner. I can't wait to laugh! :)


Thanks, My Cute Stamps, for providing this giveaway!


One More Stuff Post to Go
BTW, I promise that I make more than cards. I meeting a dear friend today, in fact, to work on a super fun jewelry project. I will share details of that here soon with a big Stuff Week grand finale. Thanks for peeking at my stuff! That's what she said. (Sorry, I just couldn't resist.) ;)


Some Post Halloween Fun


Okay, I know Halloween is over, but I couldn’t resist sharing my punkin cards with you. It is one of the many things I was going to post before Halloween, but my stinky computer virus interfered with my otherwise flawless plan.

Since this card doesn’t actually say “Happy Halloween” (on the outside, at least), I figure it can be used for any fall occasion. Know someone with a November birthday? Why not send them a cute punkin greeting? Plan on visiting someone for Thanksgiving? How about thanking your hostess with a note in a punkin?

This card is quick and easy to create, so I suggest you give it a try, whether you make it this year or save it for a Halloween greeting next year. All you need is orange cardstock, ribbon and/or ric rac, buttons and, of course, a little bling.

Count Down to World Card Making Day...and a giveaway!


Did you know that World Card Making Day (WCMD) is less than a week away? That’s right; there’s a day dedicated to making cards that is celebrated the world over on the first Saturday in October. Cool, eh?

This particular holiday is near and dear to my heart. You see, last year I, along with the rest of the Paper Crafts magazine team, busted my hump to make this day happen. (PC founded the day, so there was a lot of work to do to spread the word.) As most of you know, I’m now an editor with Simple Scrapbooks magazine (sister pub to PC), which means I haven’t been involved with the WCMD work this year. I can’t lie; this has been a slight relief – it was A LOT of work last year – but I have to admit that there’s a part of me that misses that involvement.

No worries. I may not be involved as a PC editor, but I’m definitely still celebrating as a card maker. In honor of WCMD 08, I’m going to post a new blog every day this week, complete with card-making tips, giveaways, project ideas, and more. Please check back; I'm giving away card candy with every post. Yum!

Let the countdown to WCMD begin with the first prize...


Win this fantastic Technique Tuesday stamp set, perfect for making card sentiments! Simply leave a comment on this post between now and this Friday, October 3, stating your favorite thing about cards:

Maybe it’s the feeling you get when you receive a card;
Perhaps it's the happiness that comes from giving a card to someone you care about;
Could be the creative inspiration you get from walking down the greeting-card aisle at Target;
Or is it the joy you find in making your own paper pleasure?

From the comments received, I’ll randomly select a winner to receive this clear stamp set. I’ll list the winner on my blog this Saturday, WCMD! I can’t wait to read your responses!

Megan

A Little Something

Yo, yo! What up, dawg?

Tonight was the two-hour season premier of Bones, one of my favorite shows, so I grabbed my creative supplies and sat back for some TV and crafts.

I’ve been practicing my sewing and finally think I’ve figured out how to sew a yo-yo. Yes, this is a relatively simple exercise, but it took me some practice to figure out…sad, I know.

Tonight I made a bitty yo-yo fabric flower that I decided to put on a card. I cut a canvas circle and hand-stitched it to the front of my card. Next, I fussy cut some leaves from patterned paper and added my elements together to make this thank-you. I used patterned paper and Rip Strips from Tinkering Ink and foam Thickers from American Crafts.

It’s not much, really, but I am proud that I now have a new flower option to work into my paper crafting. Maybe next time I’ll make a bigger yo-yo flower (by cutting a larger circle) and add it to a layout or frame. Good times!